ROBOT Framework Tutorial: A Comprehensive Guide to Automation Testing with Examples
Introduction to Robot Framework
Robot Framework is built on top of Python and uses a tabular test data syntax to create test cases. Test cases are composed of keywords that are executed by test libraries. Robot Framework comes with a variety of built-in libraries, including ones for testing web applications, databases, and APIs. Additionally, users can create their own custom libraries to extend the framework's capabilities.
Robot Framework is designed to be easy to use, even for those who do not have extensive programming experience. The tabular test data syntax makes it easy to create and read test cases, and the framework's built-in libraries handle many common testing tasks.
Installing Robot Framework
Before you can start using Robot Framework, you'll need to install it. Robot Framework can be installed using pip, the Python package manager. To install Robot Framework, open a command prompt or terminal window and enter the following command:
pip install robotframework
This will install the latest version of Robot Framework and any dependencies that it requires.
In addition to Robot Framework, you'll also need to install a test library to use with Robot Framework. Test libraries are modules that provide keywords that can be used in test cases. For example, the SeleniumLibrary provides keywords for automating web browsers. To install the SeleniumLibrary, enter the following command:
pip install robotframework-seleniumlibrary
Creating a Test Case
Once you have Robot Framework and the SeleniumLibrary installed, you can start creating your test case. Test cases in Robot Framework are created using a tabular syntax. Here's an example test case:
markdown*** Settings *** Documentation Example Test Case Library SeleniumLibrary
*** Test Cases *** Open Google Open Browser https://www.google.com chrome
In this example, we first specify some settings such as the documentation for the test case, and the libraries we will be using. We then define a test case called "Open Google" that uses the SeleniumLibrary to open a browser and navigate to https://www.google.com.
The test case is divided into two sections: the Settings section and the Test Cases section. The Settings section is where you specify any settings or configurations that are required for the test case. In this example, we specify the documentation for the test case and the SeleniumLibrary as the test library we will be using.
The Test Cases section is where you define the test cases themselves. In this example, we define a test case called "Open Google" that uses the SeleniumLibrary to open a browser and navigate to https://www.google.com. The test case consists of a single keyword: Open Browser. The Open Browser keyword is provided by the SeleniumLibrary and takes two arguments: the URL to navigate to and the browser to use (in this case, chrome).
Example Automation Code for Techlistic's Demo Form
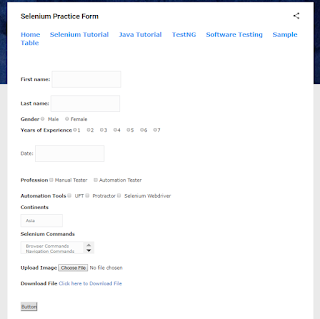
Sure, here's an example Robot Framework test case that fills out the demo form on https://www.techlistic.com/p/selenium-practice-form.html and submits it:
less*** Settings *** Documentation Demo form test case Library SeleniumLibrary *** Test Cases *** Fill out demo form and submit Open Browser https://www.techlistic.com/p/selenium-practice-form.html Chrome Maximize Browser Window Wait Until Element Is Visible id:firstname Input Text id:firstname John Input Text id:lastname Smith Choose File id:photo ${CURDIR}/test_image.jpg Select From List By Value id:dropdown_1 Female Select From List By Index id:dropdown_2 2 Select From List By Label id:dropdown_3 United States Click Element css:input[value='Selenium IDE'] Click Element css:input[value='Manual Tester'] Click Element id:submit Wait Until Page Contains Form submitted Successfully!Let's break down what each keyword does:
Let's break down what each keyword does:
- Open Browser: Opens the demo form page in the Chrome browser.
- Maximize Browser Window: Maximizes the browser window for better visibility.
- Wait Until Element Is Visible: Waits until the "firstname" field is visible before proceeding.
- Input Text: Enters the text "John" into the "firstname" field and "Smith" into the "lastname" field.
- Choose File: Uploads an image file located in the current working directory called "test_image.jpg" to the "photo" field.
- Select From List By Value, Select From List By Index, and Select From List By Label: Selects options from the dropdown fields based on their value, index, and label, respectively.
- Click Element: Clicks on the checkboxes for "Selenium IDE" and "Manual Tester".
- Wait Until Page Contains: Waits until the page contains the text "Form submitted Successfully!" before proceeding.
This test case should successfully fill out the demo form and submit it. Of course, you may need to adjust the locator values for the various form fields and buttons to match the specific implementation of the demo form on the website.
Running the Test Case
To run the test case, you can use the "robot" command followed by the name of the test case file:
robot example_test_case.robot
This will run the test case and generate a report in HTML format. The report will show the results of the test case, including any errors or failures.
Adding Assertions
To make sure our test case is actually testing something, we need to add some assertions. Assertions are checks that we make to verify that our test has succeeded. Here's an example test case with an assertion:
sql*** Settings *** Documentation Example Test Case Library SeleniumLibrary
*** Test Cases *** Search For Robot Framework Open Browser https://www.google.com chrome Input Text name=q robot framework Click Button name=btnK
Wait Until Page Contains Results
${title} Get Title
Should Contain ${title} robot framework - Google Search
In this test case, we use the SeleniumLibrary to search for "robot framework" on Google, and then use the Should Contain keyword to check that the page title contains the expected text.
Conclusion
In this tutorial, we covered the basics of Robot Framework and created a simple test case using the SeleniumLibrary. Robot Framework is a powerful tool that can be used to automate testing for a wide variety of applications and systems. By using the framework's built-in libraries or creating custom ones, you can create automated tests that save time and increase confidence in your code.


.png)


Comments
Post a Comment